Electronic processing – processing phases
Processing phases
One of the greatest improvements of E-lomake 3 software is adding processing phases into its basic functions. By using the processing phases, E-lomake expands from a form application into an electronic processing platform, which can be used to handle both internal and external processes electronically.
The processing phases can also be called workflow. In any case, a submission received through E-lomake can be assigned handlers, who have – if needed – the permission to supplement the submission and to send it forward to the next handler.
A simple workflow

Basic functions
- Each phase may be assigned one or more handlers from the E-lomake users.
- The handlers may be informed about new submission through e-mail. These announcements can also be switched off.
- When one handler opens a submission, it automatically becomes locked for the rest of the handlers. The handler may also save the submission as a draft and to lock it for a longer period of time.
- All handling events are marked in the handling log.
- The contents of each submission in each processing phase are saved.
Designing example
You should take the processing phases into account already when building the form. Some of the field groups can be displayed or hidden during certain processing phases, so you should pay attention when dividing the fields of the form into field groups. The field groups of the example form:
- Contact information
- Message
- Controller’s notes
- Acceptance notes
Handling field groups
- Field groups 1 and 2 are displayed normally for the respondents
- Field groups 3 and 4 are hidden from the respondents (Field groups – Visibility on the form – Hide from the respondent)
- In the processing phases, define the field groups which the handler sees in the editing status of the form
Implementing processing phases for a form
- Select the form settings from the link on the right side of the page.
- Select “Submission processing”
- Select Phasical processing and save your choice.
- After saving, the settings page shows a link, through which you can move to define the processing further. The settings are divided onto two tabs, Process and Processing phases.
- On the Process tab you can define the fields shown in the workflow listing, which can be used to restrict processing phases. You can also choose to inform the recipient if their saving is rejected. An example of this could be applying for a vacation and rejecting the vacation application.
- Processing phases tab can be used to create processing phases for your form.
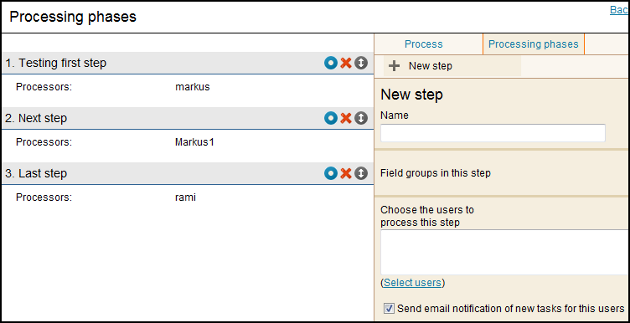
- Go to Processing phases tab and select New step.
- Name the new processing phase and select which field groups are included. Also choose the E-lomake users, who handle the phase in question. You can also choose to send an e-mail notification for the handlers.
- Once the data’s complete, save the new processing phase. The processing phases you have saved are displayed and you can edit and arrange them.

Handling replies in phases
The submissions the user has to handle are displayed on the home page under the title Processing tasks. Select the link Process on the right side of the page to start processing.

When handling the responses, you can edit the data the respondent has entered and add comments to the reply.
At the end of the processing phase, you can accept the changes by clicking Accept and change. You can also save your work as a draft and continue handling it later.
Processing phase log
Once a form has submissions, you can see the processing phase log of the submission in question.
The Processing phase log replaces the edititing function for forms which have processing phases.
The log shows the different stages of the submission, the changes as well as the times.

